 |
| Interacting with the art at the Currier Museum... |
This year's conference was fabulous and inspiring! It was held at the New Hampshire Institute of Art (NHIA) in Manchester, NH. Keynote speaker NH Artist/Illustrator/Author Marty Kelly spoke about his artistic process and how his multiple "failures" have been useful to his creative process. He urged us as educators to create a "culture of failure" in our classrooms where it is OK to make mistakes and take chances (leading students to further growth, risk-taking, exploration). He suggests that failure is part of the learning process and is essential to learning and growth. He encouraged us to change our attitude about failure as well as our students' attitudes about it as well. He explained that if we are afraid to fail we will be afraid to imagine, innovate, explore, and try. Having a classroom culture where failure is accepted and seen as an opportunity for discussion and growth also allows students to begin to accept advice and criticism and use what is right for them. He says that failure is a "pit stop along the road to success."
 |
| Keynote Speaker: Author and Illustrator Marty Kelly Photo courtesy: NHAEA website (www.NHAEA.org). |
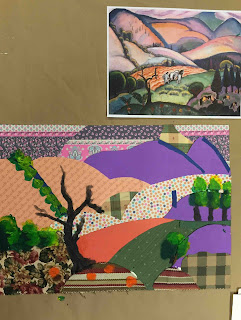
Session 1: Reinterpreting With Recylables. I went on a mini field trip to the Currier Museum of Art and saw the Mount Washington show that just opened. Mount Washington is the highest mountain in New Hampshire and is known throughout the world for its crazy weather. We went downstairs to classroom and Linn Krikorian taught us how we can use the art and artifacts within the Currier's collection as well as from life and other disciplines and have students reimagine them using recycled materials. Resources were shared for places to get interesting recyclables and for using this idea across the curriculum. Then Megan McIntyre discussed how art can be used to facilitate other ideas across the curriculum such as Science, Math, etc. This is particularly pertinent to me in my art room as I strive to develop lessons that are individualized and cross-curricular in nature. This lesson idea (and its spin-off ideas) will be helpful to me as I encourage the students to observe and reinterpret art and artifacts in class but make them their own.
 |
| My take on a Robert Indiana from the Currier's collection. |
Session 2: Structures to Sculpture (Bookmaking) This was a wonderful hands-on session led by Erin Sweeney, professor at NHIA (and her student helper Karen) taught us about a number of book-making techniques and led an open discussion amongst the creative educators present as to how we are currently using these structures within our classrooms and how we could potentially use them even more. Connections to other courses were discussed as well as connections to STEM/STEAM. While the pieces we made weren't complete (just the "bones" of the books and not fully developed within), the examples took the 2D linear idea of "book" and transformed it into 3D sculptural forms (easily!!) that could be used in our teaching in a number of ways (assessment, reflection, student mini portfolios, the documentation of a unit or the transformation of an idea, etc.). This was a VERY relevant workshop in that it allows a student to move from 2D to 3D in a seamless and accessible way while allowing them to reflect on a process or subject matter and use the 3D model-making techniques that we strive to teach them in class. This will definitely be applied to my future 7th and 8th grade classes next trimester!
 |
| Busily working at the Structures To Sculpture Session led by Erin Sweeney. Photo courtesy: NHAEA website (www.NHAEA.org). |
And here are some other images from the Currier workshop--the art of my classmates. ENJOY!


